Getting Started with specify-cli: Spec-Driven Development in Ten Minutes
AI coding agents are good at writing code and bad at remembering what you wanted. Ask one for a feature in a single prompt and it fills every gap with a guess.
Spec-driven development fixes the order of work instead of the agent. First you write down what you want and why (the spec), then the agent turns it into a plan, the plan into tasks, and only then implements the tasks. Each step is a Markdown file in your repository, so you can read it, correct it and review it before the next step builds on it.
GitHub's Spec Kit packages that workflow: a set of commands for your agent, plus templates and scripts they rely on. Its specify command sets a project up. @oakoliver/specify-cli is that command for Node and Bun, at parity with Spec Kit 1.0.12. We wrote about porting it in Porting Python's spec-kit to TypeScript and about the later sync in specify-cli v1.1.0; this article is just about using it.
One command sets up a project for your coding agent. Everything below is the real output of the commands shown, and none of it needs network access or credentials.

I – Install
npm install -g @oakoliver/specify-cli
specify --version
This gives you a specify command. It needs Node.js 18 or later, or Bun.
II – Create a Project
Pick your coding agent with --integration. This guide uses Claude Code:
specify init my-app --integration claude
init first shows where it will create the project, then asks which script flavour the agent should use: sh (bash/zsh), ps (PowerShell) or py (Python). Arrow keys move and Enter picks; Enter straight away takes the default, sh. Then it runs through its setup steps and prints what to do next. The recording at the top of this article is exactly this command.
A few variations you'll want:
specify init . --integration claude               # set up the current directory
specify init my-app --integration claude --script sh --non-interactive   # no prompts at all (CI, scripts)
init works offline. Everything it writes comes from templates bundled inside the package. I checked by running it in a macOS sandbox with all network access denied; it still produced the same 30 files.
If you leave out --integration, init asks you to pick an agent from a list of 41. The list scrolls inside the terminal, with counts of the options above and below, so it works in a standard 24-row window. Passing --integration skips the question entirely, which is what you want in scripts.
III – What Got Generated
tree -a my-app
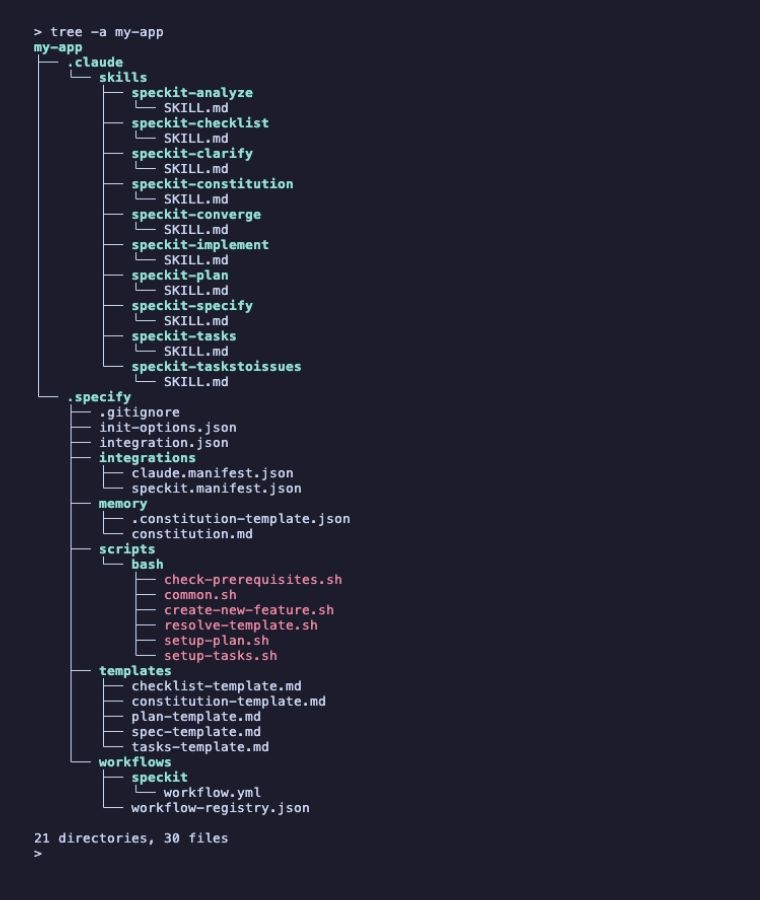
Two folders, two jobs:
.claude/skills/is for the agent. Eachspeckit-*folder holds aSKILL.md, the instructions Claude Code follows when you type the matching slash command (/speckit-specify,/speckit-plan, …). Other agents get the same instructions in their own format and folder..specify/is for the project.templates/holds the skeletons for a spec, a plan, a task list, a checklist and the constitution.scripts/bash/holds the helper scripts the skills call.memory/constitution.mdis where your project's ground rules go.init-options.jsonrecords the choices you made, so later commands know them.
Commit both folders. They're plain text, they're how your teammates' agents get the same workflow, and the specs you write next will live next to them.
init also prints a warning worth acting on: some agents keep credentials or tokens in their folder (.claude/ here), so consider adding the parts you don't want shared to .gitignore.
IV – Checking the Setup: status and doctor
Inside the project, specify status summarizes what's installed:
cd my-app
specify status
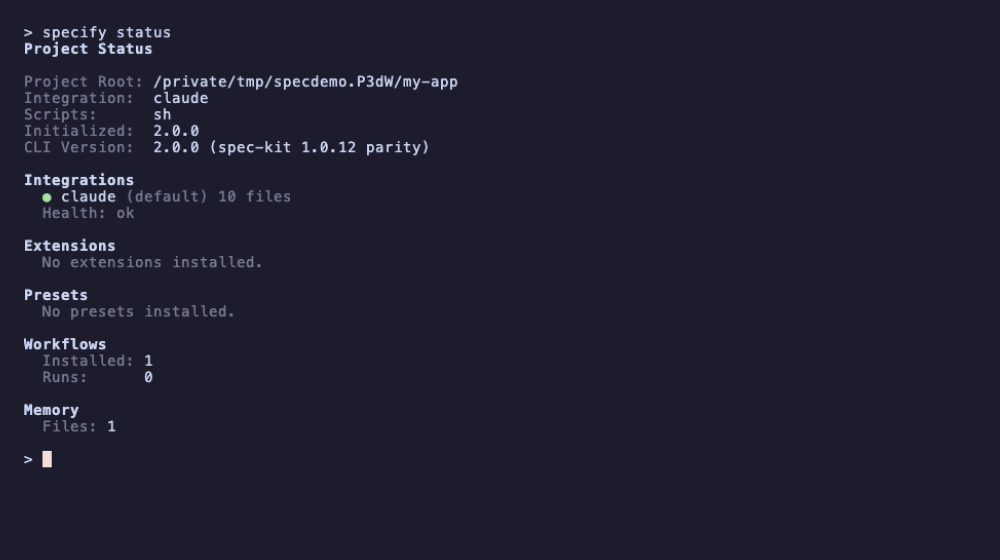
specify doctor goes further and checks that the pieces are actually there:
specify doctor
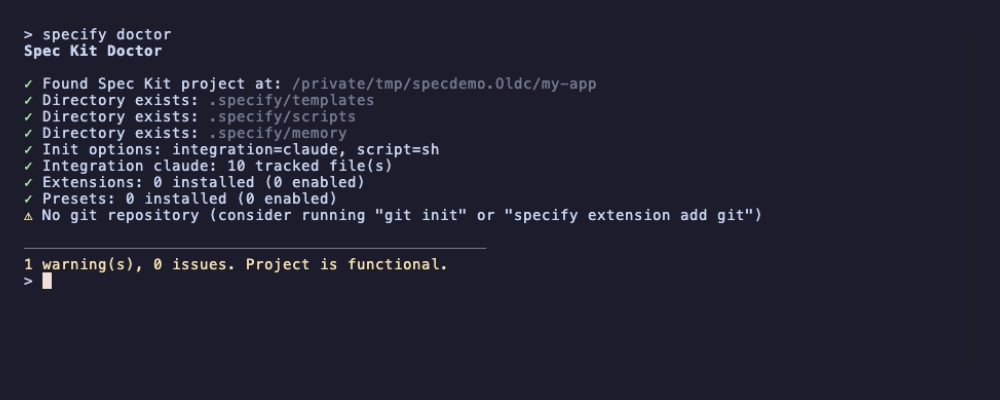
The one warning is fair: this demo folder isn't a git repository yet. Each feature you specify gets its own numbered folder under specs/, and the optional git extension doctor suggests (specify extension add git) adds a branch per feature on top. Either way you want the specs under version control, so run git init before your first one.
There's also specify check, which runs anywhere and lists every supported agent CLI with whether it's installed on your machine. It's useful when an integration doesn't seem to work.
V – The Workflow Your Agent Now Has
This is where the actual development happens, and it happens inside your coding agent, not in specify. The generated skills give you these slash commands. The descriptions below come from the SKILL.md files init wrote; open them yourself to see the full instructions.
/speckit-constitution: fill in the project's ground rules in.specify/memory/constitution.md: core principles (the template's examples include "Test-First" and "Library-First"), extra constraints, and your review process. Later steps read it./speckit-specify <what you want>: turn a plain-language feature description into a spec. The skill picks a short name for the feature, creates a numbered folder underspecs/(for examplespecs/001-user-auth/), and fillsspec.mdfrom the spec template. The spec is about what and why, not how./speckit-plan: turn the spec into an implementation plan, usingsetup-plan.shto find the feature's files. Besidesplan.md, it producesresearch.md(open questions resolved),data-model.md, interface contracts undercontracts/when the feature has external interfaces, and aquickstart.mdfor checking the result./speckit-tasks: generatetasks.md, a dependency-ordered list of tasks with IDs and file paths, specific enough that an agent can complete each one without more context./speckit-implement: work throughtasks.md, ticking each task off (- [X]) as it's done.
Three optional skills help you check the work between steps: /speckit-clarify asks structured questions about vague parts of the spec before you plan, /speckit-analyze checks the spec, plan and tasks against each other before you implement, and /speckit-checklist generates quality checklists for the requirements. There's also /speckit-converge, which compares the codebase with the spec and appends whatever is still missing to tasks.md.
The point of each step is the review in between. Read spec.md before you plan, and read plan.md before you generate tasks; fixing a wrong assumption in a paragraph is much cheaper than fixing it in code.
(I haven't run an agent for this article, so there's no recording of these steps; every file name above comes from the skill instructions themselves.)
VI – Other Agents
Claude Code is one of 41 integrations. specify integration list, run inside a project, shows them all:
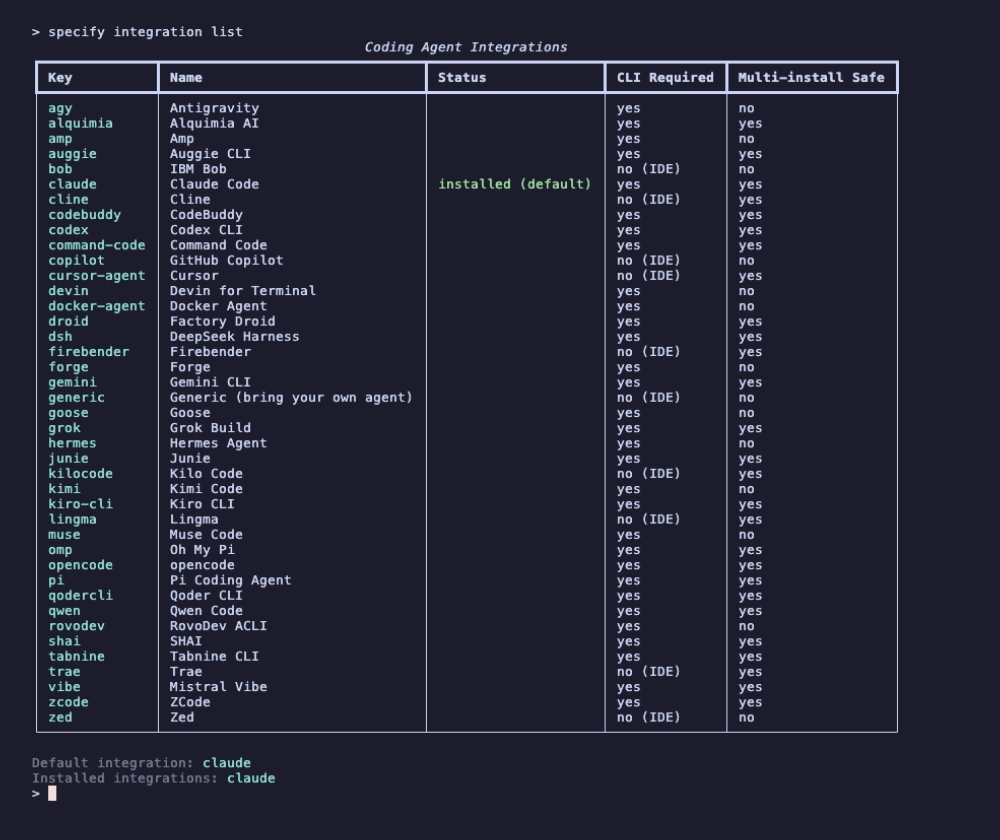
Use the key with --integration at init, for example --integration codex, --integration gemini or --integration copilot. Each integration writes the same workflow in the format its agent expects, into that agent's own folder. The "Multi-install Safe" column tells you which ones can share a project, if your team uses more than one agent.
VII – What to Read Next
- Spec Kit's documentation explains the methodology in depth, with full examples of specs, plans and task lists.
- The specify-cli README covers the commands this guide skipped:
extension,preset,workflow,bundle,artifactandself. - Porting Python's spec-kit to TypeScript is the story of how this port was itself built with spec-driven development.
VIII – Requirements
- Node.js 18 or later (the package's
enginesfield), or Bun. I ranspecify initon Node 18.20, 20.6, 22.16 and 26.8 and on Bun 1.4; each produced the same 30 files. The recordings use Node 26.8 on macOS. - No network or credentials for
init,status,doctor,checkorintegration list. - A coding agent to actually run the workflow, such as Claude Code;
specifyonly prepares the project for it. - git is recommended, so the specs, plans and task lists are versioned with your code.