Getting Started with Glamour in TypeScript: Render Markdown in the Terminal
Command-line tools are full of Markdown: READMEs, changelogs, help text, release notes. Printed raw, it's a mess of #, ** and pipe characters. Glamour is Charm's Markdown renderer for the terminal: it turns Markdown into styled output with real headings, aligned tables, task lists and syntax-highlighted code.
@oakoliver/glamour is the TypeScript port. It runs on Node, Bun and Deno, and it's what powers Glow, our port of Charm's full terminal Markdown reader.
Five short steps, from one function call to a script that renders any README in your terminal. Every picture is the real output of the code above it.

I – Install
npm install @oakoliver/glamour
# or
bun add @oakoliver/glamour
# or
deno add npm:@oakoliver/glamour
Glamour uses Lip Gloss (installed alongside it as a peer dependency) plus two runtime dependencies: highlight.js for syntax highlighting and node-emoji for :emoji: shortcodes.
The examples are TypeScript files. Bun and Deno run them directly, and so did Node 26 in our tests; on older Node versions, use tsx: npx tsx hello.ts.
II – Render a String
One function, one string in, one string out.
// hello.ts
import { render } from '@oakoliver/glamour';

const markdown = `# Hello, Glamour

Markdown, rendered for the **terminal**: *emphasis*, \`inline code\`
and [links](https://github.com/oakoliver/glamour).

- lists
- [x] task lists
- tables, code blocks and more
`;

console.log(render(markdown));
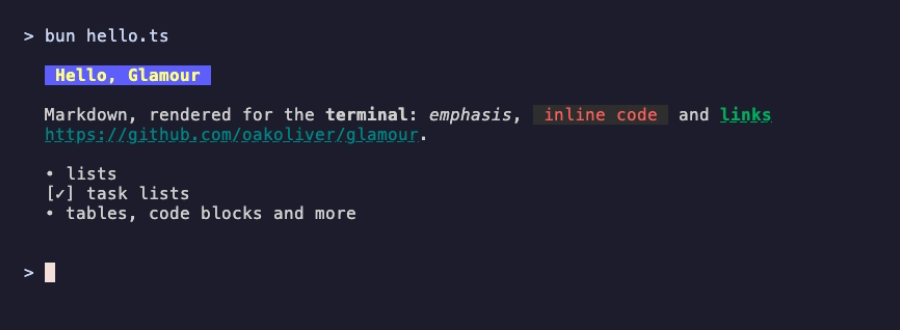
render() uses the dark style and wraps at 80 columns by default. Notice the link: Glamour prints the link text and then the URL, because many terminals can't make text clickable. Where the terminal supports it, the link is also an OSC 8 hyperlink you can click.
III – Pick a Style
Glamour has seven built-in styles: dark, light, ascii, dracula, tokyo-night, pink and notty. renderWithStyle takes the name as its second argument:
// styles.ts
import { renderWithStyle } from '@oakoliver/glamour';

// One of: dark, light, ascii, dracula, tokyo-night, pink, notty
const style = process.argv[2] ?? 'dark';

const markdown = `# Release notes

**v2.0** ships a *new* renderer.

> Upgrading is a one-line change.

\`\`\`ts
const out = renderWithStyle(md, '${style}');
\`\`\`
`;

console.log(renderWithStyle(markdown, style));

ascii uses no color and keeps the Markdown markers (#, **, *), which is useful in logs and CI. notty is meant for output that isn't going to a terminal at all. Use light on light terminal backgrounds: like Lip Gloss, the port can't ask the terminal for its background color, so withAutoStyle() always picks dark, and choosing is up to you.
IV – Control the Width
For anything beyond the defaults, create a TermRenderer and pass it options. withWordWrap sets the width paragraphs are wrapped to:
// wrap.ts
import { TermRenderer, withStandardStyle, withWordWrap } from '@oakoliver/glamour';

const width = Number(process.argv[2] ?? 80);

const renderer = new TermRenderer(withStandardStyle('dark'), withWordWrap(width));

console.log(
  renderer.render(`## Word wrap at ${width}

Glamour wraps paragraphs to the width you give it, keeps the document margin on
every line, and never splits a word unless it is longer than the line itself.

| Option | Default |
| --- | --- |
| withWordWrap | 80 |
| withTableWrap | true |
`),
);
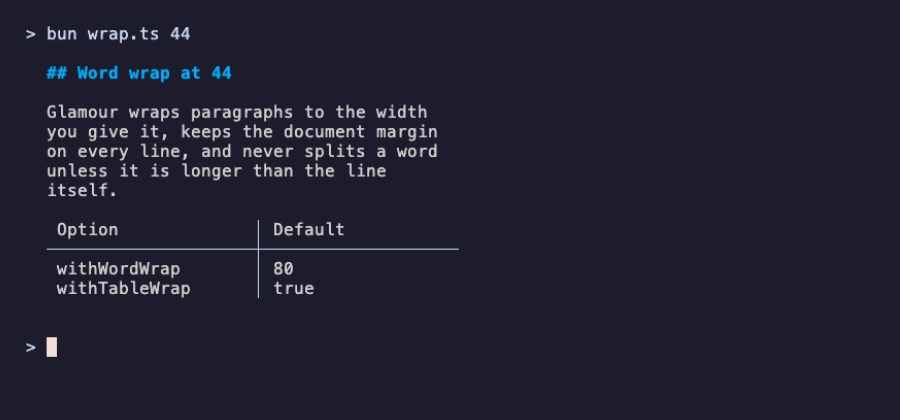
Tables fit themselves into the same width. If a cell is too long, withTableWrap(true) (the default) wraps it, and withTableWrap(false) truncates it instead. Other options include withEmoji() for :shortcode: emoji, withBaseURL() to resolve relative links, and withPreservedNewLines() to keep single line breaks.
V – Your Own Style
A style is a plain object of type StyleConfig, with one entry per Markdown element: h1 to h6, paragraph, strong, emph, link, item, code_block, table and so on. You don't have to write one from scratch. The built-in styles are exported (DarkStyle, LightStyle, DraculaStyle and others), so spread one and override what you want:
// custom.ts
import { TermRenderer, withStyles, DarkStyle, type StyleConfig } from '@oakoliver/glamour';

// Start from a built-in style and override only what you want to change.
const style: StyleConfig = {
  ...DarkStyle,
  h1: { ...DarkStyle.h1, color: '#FAFAFA', background_color: '#F25D94', prefix: ' ✿ ', suffix: ' ' },
  h2: { ...DarkStyle.h2, color: '#F25D94', prefix: '› ' },
  strong: { ...DarkStyle.strong, color: '#F25D94' },
  link: { ...DarkStyle.link, color: '#7D56F4', underline: true },
  item: { ...DarkStyle.item, block_prefix: '✦ ' },
};

const renderer = new TermRenderer(withStyles(style));

console.log(
  renderer.render(`# Changelog

## 2.0.0

- **Breaking:** new renderer
- Faster tables
- Docs at [oakoliver/glamour](https://github.com/oakoliver/glamour)
`),
);
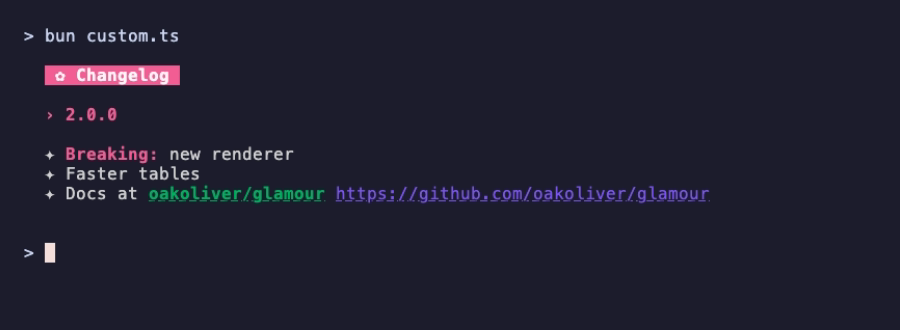
The keys use snake_case (background_color, block_prefix) because the style format is shared with Go Glamour's JSON style files. That also means you can load an existing Glamour JSON theme with withStylePath('path/to/style.json') or withStylesFromJSON(text).
VI – A Tiny README Viewer
Put it together: a script that reads a Markdown file (or standard input), wraps it to the terminal's width, and lets the GLAMOUR_STYLE environment variable pick the style.
// md.ts
import { readFileSync } from 'node:fs';
import { TermRenderer, withStandardStyle, withWordWrap } from '@oakoliver/glamour';

// Usage: bun md.ts README.md   (or: cat README.md | bun md.ts)
const path = process.argv[2];
const markdown = readFileSync(path ?? 0, 'utf8');

const width = Math.min(process.stdout.columns ?? 80, 100);
const style = process.env.GLAMOUR_STYLE ?? 'dark';

const renderer = new TermRenderer(withStandardStyle(style), withWordWrap(width));
process.stdout.write(renderer.render(markdown));
readFileSync(0) reads standard input, so cat README.md | bun md.ts works too. The recording at the top of this article is this script rendering a small sample file, NOTES.md. For long documents, pipe it into a pager that keeps colors: bun md.ts README.md | less -R.
When you want more than this (a file browser, a scrolling pager, search, line numbers), that's Glow: npx @oakoliver/glow README.md. It's built on exactly this renderer.
VII – What to Read Next
- The README at github.com/oakoliver/glamour lists every option and documents the few places where the port differs from Go Glamour v2.0.1 (mainly syntax highlighting, which uses highlight.js instead of chroma).
- The examples folder has a theme gallery and a side-by-side comparison of two styles.
- How it was built: Porting Go's Terminal UI Ecosystem to TypeScript: Glamour and Lip Gloss, and for the reader on top of it, Porting Go's Glow to TypeScript.
VIII – Requirements
- Node.js: the package doesn't declare a minimum version. We ran these examples on Node 18.20, 20.18 and 22.16 through
tsx, and on Node 26 directly. - Bun: all examples were developed and recorded on Bun 1.4.
- Deno:
render()needs no permissions. The README viewer reads a file and an environment variable, so run it withdeno run --allow-read --allow-env md.ts NOTES.md.