Getting Started with gum: Interactive Shell Scripts Without Writing a TUI
Shell scripts are where most automation starts, and where most of it stays ugly: read -p, a case statement for menus, and echo for everything else. Building a proper terminal UI fixes that, but nobody wants to write a TUI program to ask one question.
gum sits in between. Each gum command is one interactive widget (a menu, a text prompt, a yes/no question, a spinner) that you call from bash like any other program. It prints the answer on stdout, so $(...) captures it, and it reports yes and no through its exit code, so if and && work.
@oakoliver/gum is the TypeScript port of Charm's gum. It's built on our ports of Bubble Tea, Bubbles, Lip Gloss and Glamour, and it runs on Node and Bun.
Seven small bash scripts, from a one-line menu to a commit helper that really commits. Every picture below is the script beside it, running.

I – Install
npm install -g @oakoliver/gum
gum --version
That puts a gum command on your PATH. Everything in this guide is plain bash calling gum, so there's nothing else to set up.
One thing to know before the first script: gum draws its interface on stderr and prints only the answer on stdout. That's why ANSWER=$(gum choose ...) works: the menu still reaches your terminal while the command substitution captures just the choice.
II – A Menu in One Line
gum choose takes options as arguments and prints the one you pick.
#!/usr/bin/env bash
FLAVOR=$(gum choose --header "Pick a flavor" Strawberry Banana Cherry)
echo "You picked $FLAVOR"
Arrow keys move, Enter picks. Options can also come from stdin, one per line, so ls | gum choose works; gum then reads your key presses from the terminal instead of the pipe.
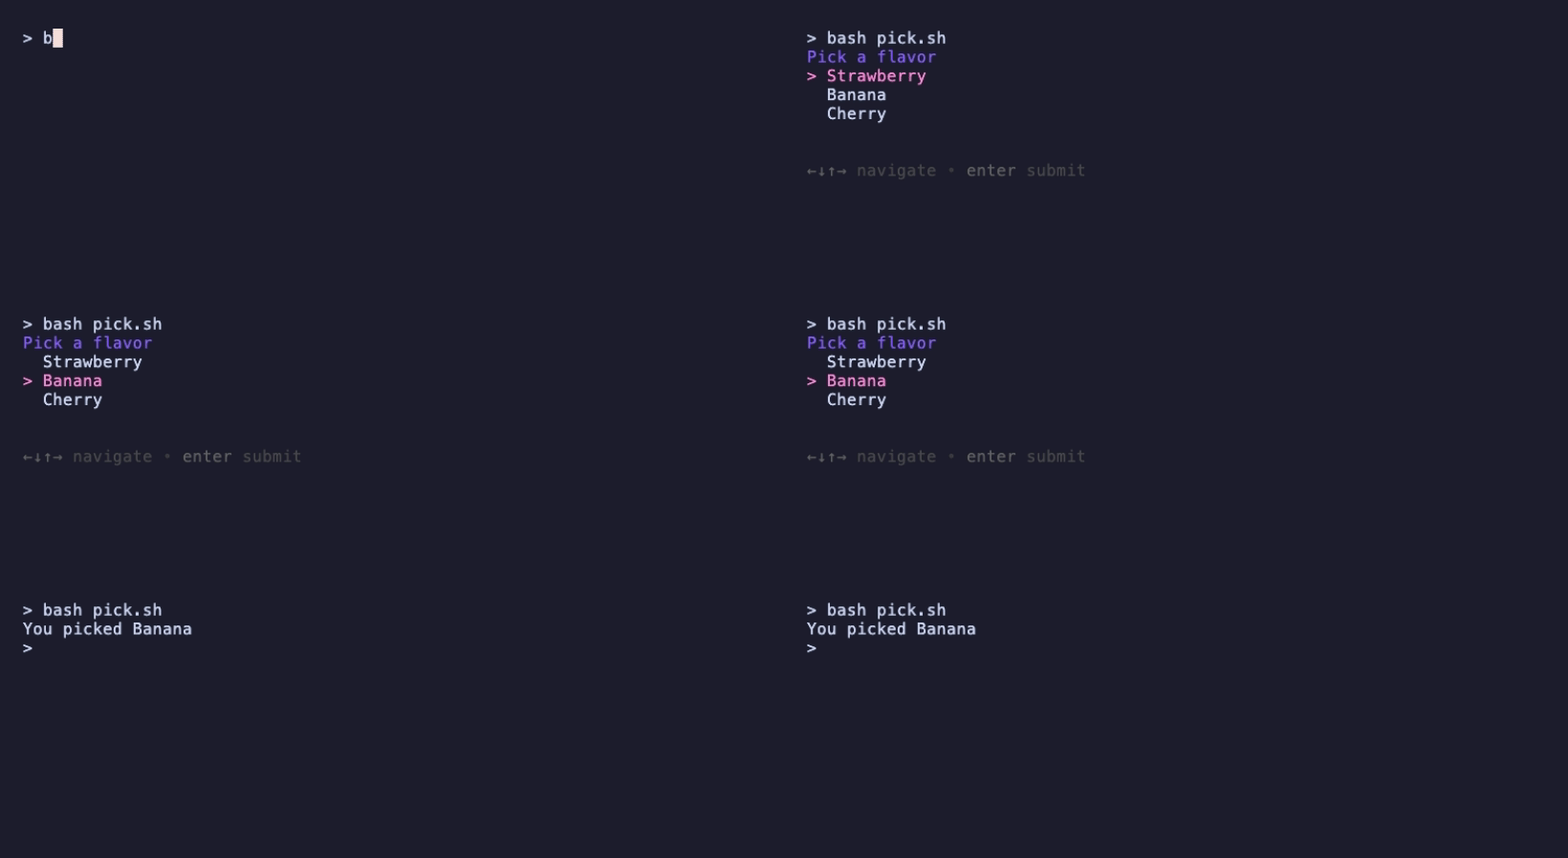
Add --limit 3 or --no-limit to pick several; each choice is printed on its own line.
III – Asking Questions: input and confirm
gum input reads one line of text. gum confirm asks a yes/no question and answers through its exit code: 0 for yes, 1 for no. That makes it read naturally in an if.
#!/usr/bin/env bash
NAME=$(gum input --placeholder "Your name")

if gum confirm "Say hello to $NAME?"; then
  echo "Hello, $NAME!"
else
  echo "Maybe later."
fi
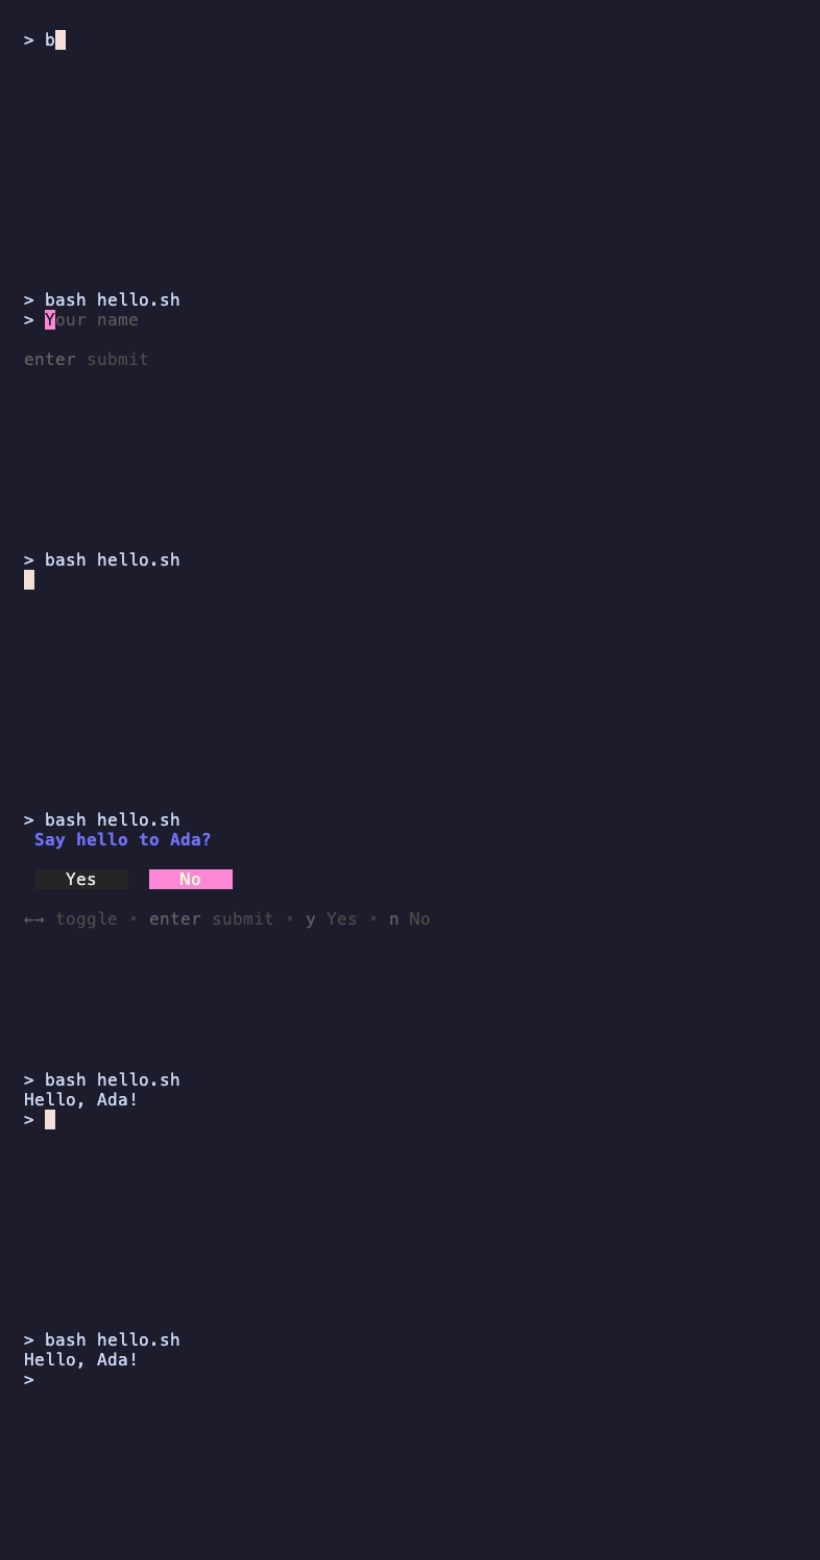
←/→ toggle the buttons, and y/n answer directly. Pressing Esc in gum input exits with 1 and prints nothing, and Ctrl+C in any of the prompts (input, write, choose, confirm) exits with 130, the usual code for an interrupt, so a script can tell "no" apart from "cancelled". Every command also has its own help: gum input --help.
For a password, use gum input --password. For several lines of text there's gum write, which we'll use in the last step.
IV – Spinners Around Slow Commands
gum spin runs a command and shows a spinner until it finishes. Put the command after --:
#!/usr/bin/env bash
gum spin --spinner dot --title "Installing dependencies..." -- sleep 2
echo "Exit code: $?"

gum spin --spinner moon --title "Running a failing step..." -- bash -c 'sleep 1; exit 3'
echo "Exit code: $?"
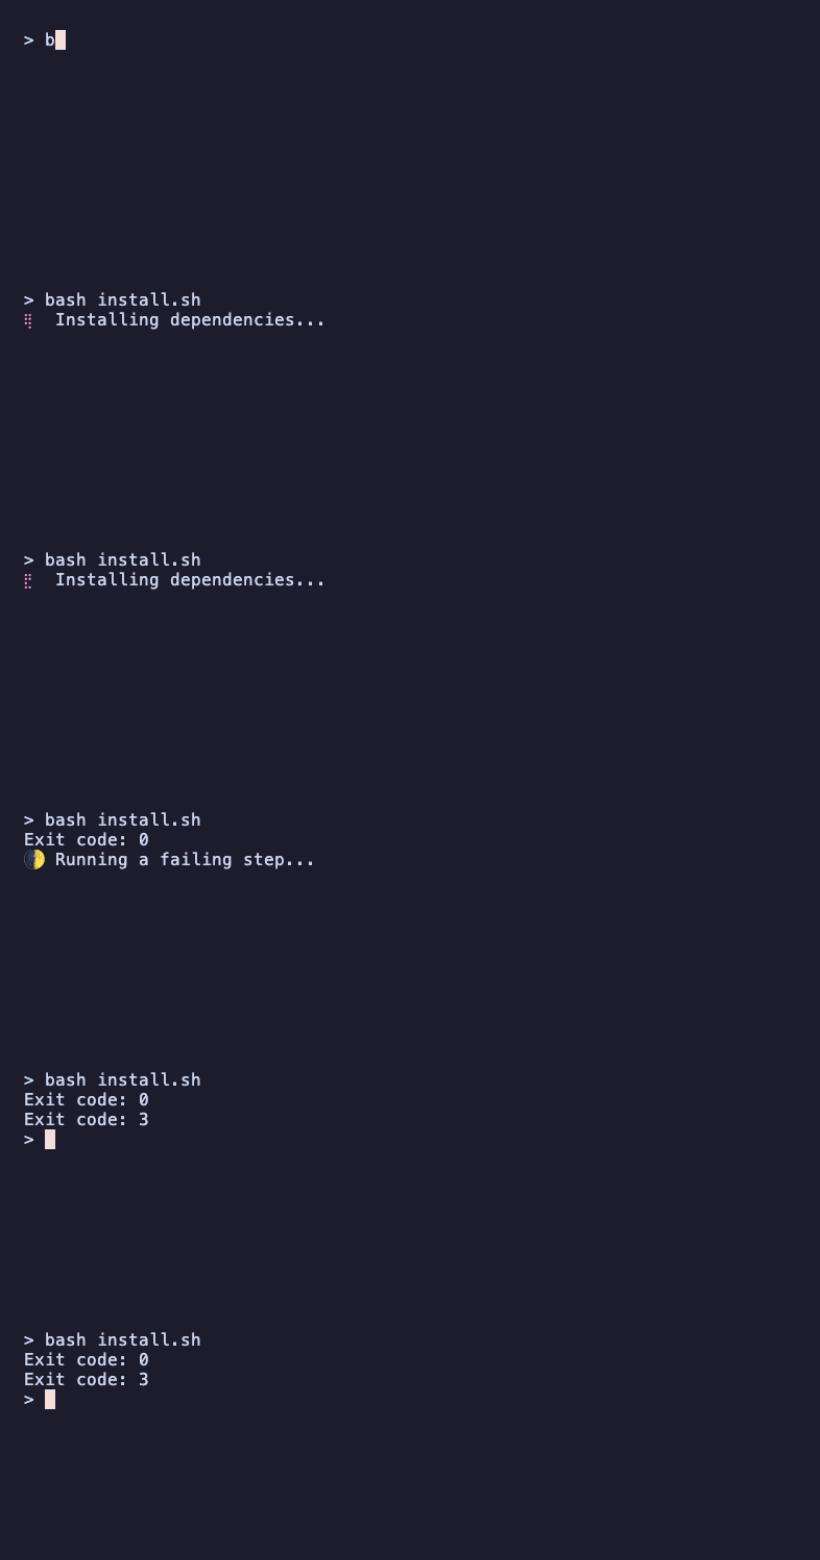
Three details make this safe to drop into real scripts:
- The exit code is the command's. The second step exits
3, and so doesgum spin. - The command runs directly, not through a shell, so its arguments arrive exactly as you wrote them. When you need a pipe or
&&, wrap it inbash -cas above. - The command's output is hidden unless you ask for it with
--show-output, or--show-errorto print it only when the command fails.
V – Styled Output: style and join
gum style draws text with colors, borders, padding and alignment. gum join places blocks next to each other (the default) or on top of each other with --vertical. Because gum keeps the colors when its output is captured, you can build blocks with $(...) and join them:
#!/usr/bin/env bash
TITLE=$(gum style --foreground 212 --border double --border-foreground 212 \
  --align center --width 44 --padding "0 2" "Release 2.0" "Codename: Bubble")

LEFT=$(gum style --border rounded --border-foreground 99 --padding "0 1" --width 20 \
  "Tests" "128 passed")
RIGHT=$(gum style --border rounded --border-foreground 42 --padding "0 1" --width 20 \
  "Build" "dist/ 412 KB")

gum join --vertical --align center "$TITLE" "$(gum join "$LEFT" "  " "$RIGHT")"
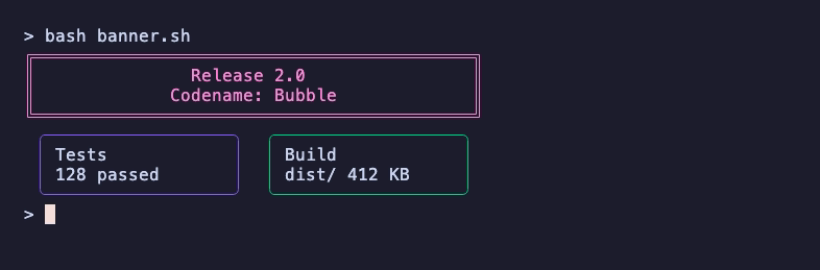
(The numbers are sample text; in a real script they'd come from your test run and build.)
Each argument to gum style becomes its own line. Borders are normal, rounded, double, thick, hidden or none, and colors take ANSI numbers (212) or hex ("#FF5F87"). --width includes the border, so the two 20-wide boxes and the 2-space gap come to 42 columns, centered under the 44-wide title.
VI – Markdown and Templates: format
gum format renders Markdown in the terminal, using Glamour under the hood. Pipe a file in, or pass the text as arguments:
# Release notes

Version **2.0** is out. Highlights:

- Faster *startup*
- `--json` output for every command
- Fewer bugs

| Platform | Status |
|----------|--------|
| macOS    | ok     |
| Linux    | ok     |
gum format < notes.md
gum format -t template '{{ Bold "Done:" }} {{ Color "42" "0" " 3 files " }}'
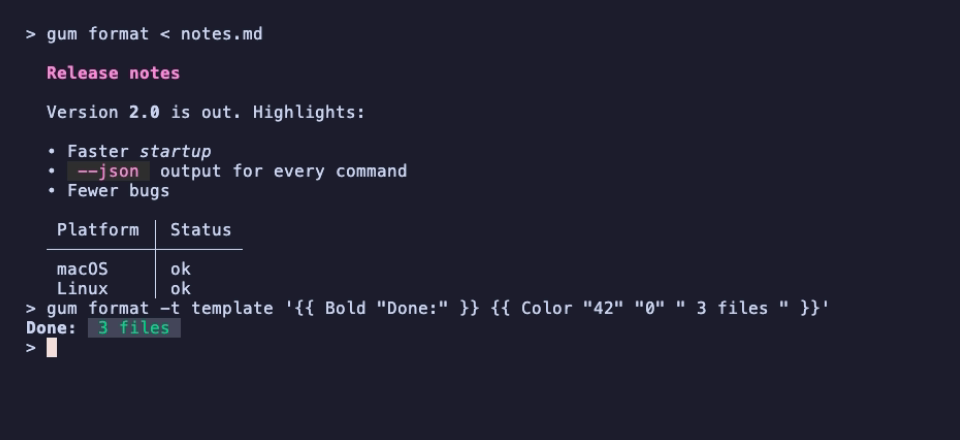
--type (or -t) switches the input format: markdown is the default, and there are also code (with --language), emoji (:rocket: shortcodes) and template, which takes functions like Bold, Italic, Faint, Underline and Color "fg" "bg" "text".
VII – Tables From CSV
gum table reads CSV from stdin or --file. With --print it just draws the table; without it, you get a selectable table that prints the chosen row.
Flavor,Price,Stock
Strawberry,$1.00,24
Banana,$0.90,8
Cherry,$1.20,0
Watermelon,$1.50,15
gum table --print --file flavors.csv
gum table --file flavors.csv --return-column 1

--return-column 1 prints just the first column of the selected row, which is usually what a script wants. Without it you get the whole row as CSV.
VIII – Putting It Together: A Commit Helper
The classic gum demo is a conventional-commit helper, and it uses almost every command above. This version really commits:
#!/usr/bin/env bash
# A conventional-commit helper built from gum commands.
TYPE=$(gum choose --header "Type of change" fix feat docs refactor test chore) || exit 1
SCOPE=$(gum input --placeholder "scope (optional)") || exit 1
[ -n "$SCOPE" ] && SCOPE="($SCOPE)"

SUMMARY=$(gum input --value "$TYPE$SCOPE: " --placeholder "Summary of this change") || exit 1
BODY=$(gum write --placeholder "Details (ctrl+j for a new line)") || exit 1

gum style --border rounded --border-foreground 212 --padding "0 1" "$SUMMARY" "" "$BODY"
gum confirm "Commit?" || exit 1

gum spin --title "Committing..." -- git commit --quiet -m "$SUMMARY" -m "$BODY"
gum log --structured --level info "Committed" sha "$(git rev-parse --short HEAD)"
The recording at the top of this article is this script in a repository with one staged file. A few things worth copying into your own scripts:
|| exit 1after every prompt. If the user pressesEscat any of them, the command exits non-zero, and the script stops instead of committing an empty message.--valuepre-fills the input, so the summary already starts withfeat(readme):and the user only types the rest.gum writetakes multi-line text:Entersubmits andCtrl+Jinserts a new line.gum logprints a levelled log line. With--structured, the arguments after the message are key/value pairs (sha=57d2de1).
Save it as commit.sh in a repository with staged changes and run bash commit.sh.
IX – What to Read Next
- The gum README lists every command and flag, including
file(a file picker),pager,writeandlog, which this guide only touched. - If one command per widget stops being enough and you want a whole interactive program, the same building blocks are libraries: Bubble Tea for the program, Bubbles for the components and Lip Gloss for the styling.
- Upstream charmbracelet/gum has more example scripts; most work unchanged, since the port follows gum v0.17.0. The upstream
filtercommand isn't ported yet, andwritecan't open$EDITORwithCtrl+E.
X – Requirements
- Node.js or Bun. The
gumbinary runs with Node. I ranstyle,join,format,spinandtable --printon Node 18.20, 20.6, 22.16 and 26.8 and on Bun 1.4, and recorded the interactive commands on Node 26.8. - A terminal for the interactive commands. They need a TTY to draw on, even when stdin is a pipe.
- macOS or Linux. Every script here was run on macOS with bash.